Chapter 8: Interacting with AutoLISP
AutoLISP offers a number of ways to interact with AutoCAD and the user. You have already seen how AutoLISP can control system variables through the setvar and getvar functions and you have seen the various ways your programs can obtain information from the user through the get functions. You can also control the display of menus, status and coordinate lines, graphic and text screens, and even the drawing area. By giving you control over the display, you can enhance the way your programs interact with the user.
When writing your program, consideration should be made as to how the program will act under various conditions. In this chapter, you will explore some of the ways you can exploit AutoLISP and AutoCAD features to make your programs more responsive to the user.
Reading and Writing to the Screen
There are many functions that will allow you to write prompts to the prompt line. But you are not limited to control of the prompt. Several functions are available that allow you to both read and write to other parts of the AutoCAD drawing editor. In this section, you will examine these functions.
Reading the Cursor Dynamically
In chapter 3 you used a function called RXY. This function reads the cursor location relative to a reference point and writes the relative coordinate directly to the coordinate readout. This is done dynamically as the cursor moves. The function that allows this to occur is the grread function. Grread's syntax is:
(grread [optional track argument])
Grread is a general input device reading function. It reads input from the keyboard, buttons on your pointing device, or the cursor location. Grread returns a list of two elements:
([integer][coordinate list or integer])
The first element is a code representing the type of input received. The second element is either an integer or list depending on whether a point has been input or a keyboard or pointing device button has been depressed. Table shows a list of codes for the first element of the list returned by grread:
|
Input Code |
Meaning |
|
(2 [ASCII code]) |
keyboard pressed. The second element of the list will be an integer representing the ASCII code of the key character pressed. |
|
(3 [coordinate]) |
Cursor location picked. The second element of the list will be a coordinate list. |
|
(4 [cell #]) |
Screen menu cell picked. The second element of the list will be an integer representing the cell number. The cells are numbered from top to bottom. |
|
(5 [coordinate]) |
Dynamic cursor mode. The second element of the list will be a coordinate list. This code is returned only if a non-nil argument is supplied to the grread function. |
|
(6 [button #]) |
Button on pointing device pressed. The second element of the list will be an integer representing the button number. |
|
(7 [box #]) |
Tablet1 menu item selected. The second element of the list will be an integer representing the tablet item box number. |
|
(7-10 [box #]) |
Tablet menu item selected. 7 equals tablet1 menu group, 8 equals tabalet2 menu group and so on. The second element of the list will be an integer representing the tablet item box number. |
|
(11 [box #]) |
Aux1 menu item selected. The second element of the list will be an integer representing the tablet item box number. |
|
(12 [coordinate]) |
If two grread functions are used in sequence, and the first returns a code 6, the second grread will return a code 12 and its second element will be the coordinate of the cursor at the time the pointing device button was picked. |
|
(13 [menu cell #]) |
Screen menu item picked using keyboard input. The second element of the list will be the menu cell number. |
Open a new AutoCAD file and turn on the snap mode. Enter the following at the AutoCAD command prompt:
(grread)
Now pick a point near the center of the screen using our mouse or digitizer puck. You will get a list similar to the following:
(3 (7.0 5.0 0.0))
The first element of the list is the integer 3. this tells us that the pick button on the pointing device was entered. The second element is a coordinate list showing the coordinate that was picked.
lets look at the expression in the RXY function that uses grread to read the cursor dynamically:
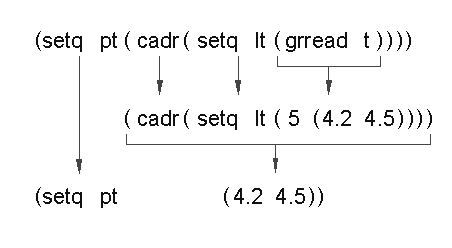
(setq pt (cadr (setq lt (grread t))))
The t argument tells grread to read the cursor location dynamically, that is, read it regardless of whether a button has been pushed or not. By using the T option, grread reads the cursor location even as it moves. The value from grread is assigned to the symbols lt for later processing. This value in turn is applied to cadr to obtain the coordinate list from grread. Finally, the coordinate list is assigned to the symbol pt (see figure 8.1).
Once the coordinate is read by grread in the above expression, it is processed by the following set of expressions:
(if (= (car lt) 5)
(progn
(setq x (strcat
(rtos (- (car pt) (car lpt1))) " x "
(rtos (- (cadr pt) (cadr lpt1))) " SI= "
(rtos (*(- (car pt) (car lpt1))
(- (cadr pt) (cadr lpt1))
)
2 2)
)
)
(grtext -2 x)
)
)
This set of expressions takes the x and y components of the point pt and subtracts them from the x and y components of the reference point lpt1, which is selected earlier by the user. It then multiplies the remaining x and y values together to get the area of the rectangle formed by these two points. Finally, these values are turned into strings that can be sent to the screen.
First, the if expression tests to see if the code gotten from grread is 5. This checks to see if the coordinate was derived from the cursor in a drag mode.
(if (= (car lt) 5)(progn
Remember that lt is the list from the grread expression so the car of lt is its first element, the input code.
The next line is the outer most nest of an expression that combines a set of strings together into one string using strcat:
This is followed by an expression that subtracts the x component of lpt1, our reference point, from the x of the current point pt:
(rtos (- (car pt) (car lpt1))) " x "
The resulting difference is converted into a string by rtos. The " x " element in this expression is the x that appears between the x and y value in the coordinate readout (see Figure 8.2).
The next expression subtracts the y component of lpt1 from the y of the current point pt then converts the resulting difference into a string:
(rtos (- (cadr pt) (cadr lpt1))) " SI= "
The " SI= " at the end of this line is the SI= that appears after the coordinate list in the coordinate readout.
The next two expressions multiplies x and y value differences to get the area of the rectangle represented by lpt1 and pt:
(rtos (*(- (car pt) (car lpt1))
(- (cadr pt) (cadr lpt1))
)
2 2)
)
)
The 2 2 in the fourth line down are the unit style and precision arguments to the rtos function.
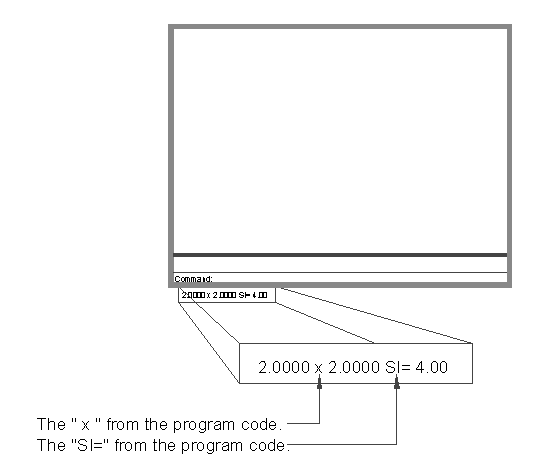
Figure 8.2: The elements of the coordinate readout
Writing Text to the Status and Menu Areas
Finally, all the values of the preceding group of expressions are concatenated then stored as the variable x which is in turn given as an argument to grtext:
(grtext -2 x)
)
);end if
Grtext writes the value of x to the coordinate readout. Grtext's syntax is:
(grtext [cell code] [string] [optional highlight code])
The cell code is the number of the screen menu cell you want to write the string to. Screen menu cells are numbered from 0 to the maximum number of cells available minus 1. If a -1 is used for the cell code, the string is written to the status area to the left of the coordinate readout. If the code is -2, as in the RXY function above, it is written to the coordinate readout area (see figure 8.3).
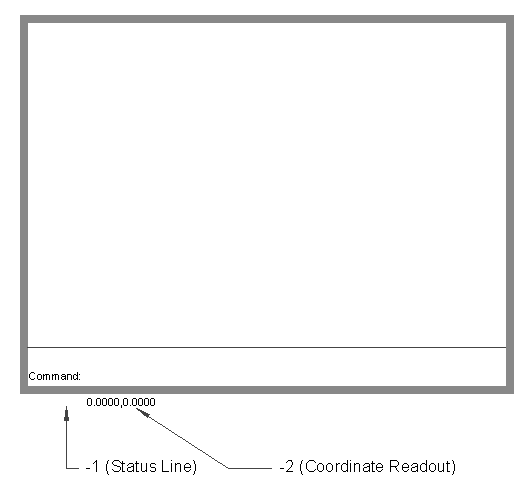
Figure 8.3: The AutoCAD screen and the corresponding screen codes
Although grtext allows you to display a string in the screen menu, such a string cannot be read by picking it with the cursor as you might think. Instead, the underlying menu option that has been written over by the grtext function is activated. If you want to override the underlying menu option, you can use grread to find the cell number picked using the using the cursor. Once you know the cell number, you can write expressions that instruct AutoCAD to perform alternate tasks.
Near the end of the RXY program, an expression sets the variable pick to T or nil depending on the input code from the variable lt:
(setq pick (= 3 (car lt)))
If the input code from lt is equal to 3, then pick is set equal to T, otherwise it is set to nil. This expression controls the while expression. If you look at the beginning of the while expression, the use of this expression becomes more clear (see figure 8.4).
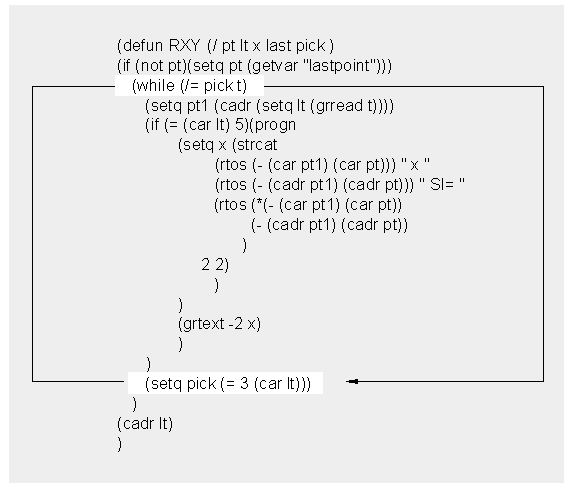
The while expression continually evaluates its set of expressions as long as pick is not equal to t. The last expression checks to see if the input code from lt is 3. If it is, that means that a point has been picked using the pick button. Pick is then set to T and the while expression stops running.
To make your program easier to use, you may want to have a particular menu appear whenever your program runs. AutoLISP provides the menucmd function for this purpose. Menucmd's syntax is:
(menucmd [menu specification])
The menu specification is a code used to call a particular menu. The code resembles the code used within the menu system to call other menus (see Appendix___ for details on menu codes). The only difference between these codes and their menu counterpart is that the menucmd code is not preceded by a dollar sign. The following table gives a brief description of these codes:
|
Code |
Description |
|
bn=menu name |
Calls button menus. The n that follows the b is the number of the button menu group. |
|
s=menu name |
Calls screen menus |
|
pn=menu name |
Calls Pull down menus. The n that follows the p is the number of the pull down menu group. |
Figure 8.5 Shows the box program from chapter 2 with the addition of the menucmd function that calls the osnap screen menu. If you were to load and run this program, the osnap screen menu would appear at the first prompt. (Note that screen menus are not a standard part of AutoCAD release 13 or 14 though they can be turned on for compatibility with older versions.)
(defun c:BOX ( /  pt1 pt2 pt3 pt4 )
(menucmd "s=osnapb")
(setq pt1 (getpoint "Pick first corner: "))
(setq pt3 (getcorner pt1 "Pick opposite corner: "))
(setq pt2 (list (car pt3) (cadr pt1)))
(setq pt4 (list (car pt1) (cadr pt3)))
(command "line" pt1 pt2 pt3 pt4 "c" )
)
Figure 8.5: The modified box program
Using menucmd with the pull down menu's is a bit more involved. Figure 8.6 shows the same program again this time making a call to the filters pull down menu. If you load and run this program, the tools pull down menu with the osnap options will pop down.
(defun c:BOX ( /  pt1 pt2 pt3 pt4 )
(menucmd "p1=filters")
(menucmd "p1=*")
(setq pt1 (getpoint "Pick first corner: "))
(setq pt3 (getcorner pt1 "Pick opposite corner: "))
(setq pt2 (list (car pt3) (cadr pt1)))
(setq pt4 (list (car pt1) (cadr pt3)))
(command "line" pt1 pt2 pt3 pt4 "c" )
)
Figure 8.6: The box program modified to call a pull down menu
Notice that a line was added in addition to the first menucmd line:
(menucmd "p1=*")
Just as you must include the $p1=* in a menu macro to display the tools pull down menu, you must also include the asterisk call in your AutoLISP program following any pull down menu call.
Drawing Temporary Images on the Drawing Area
There may be times when you will want an image drawn in the drawing area that is not part of the drawing database. Such a temporary image can be useful to help you locate points or draw temporary images to help place blocks or other objects. Figure 8.7 shows a program that performs zooms in a different way from the standard AutoCAD zoom. In this program called C:QZOOM, the screen is divided visually into four quadrants. You are prompted to pick a quadrant at which point the quadrant is enlarged to fill the screen. Optionally, you can press return at the Pick quadrant prompt and you will be prompted to pick a new view center. This option is essentially the same as a pan. Copy C:QZOOM into an AutoLISP file and load and run it.
(defun mid (a b)
(list (/ (+ (car a) (car b) ) 2) (/ (+ (cadr a) (cadr b) ) 2))
)

(defun C:QZOOM (/ center height ratio width
                  wseg hseg ll ur ul lr newctr)

;find screen position
(setq center (getvar "viewctr"))
(setq height (getvar "viewsize"))
(setq ratio  (getvar "screensize"))
(setq width  (* height (/ (car ratio)(cadr ratio))))
(setq wseg   (/ width  2.0))
(setq hseg   (/ height 2.0))

;find screen corners
(Setq ll (list (- (car center) wseg)(- (cadr center) hseg)))
(Setq ur (list (+ (car center) wseg)(+ (cadr center) hseg)))
(Setq ul (list (- (car center) wseg)(+ (cadr center) hseg)))
(Setq lr (list (+ (car center) wseg)(- (cadr center) hseg)))

;draw screen quadrants
(grdraw center (polar center pi wseg) -1 1)
(grdraw center (polar center 0  wseg) -1 1)
(grdraw center (polar center (* pi 0.5) hseg) -1 1)
(grdraw center (polar center (* pi 1.5) hseg) -1 1)

;get new center and height
(setq newctr (getpoint "\nPick quadrant/<pan>: "))
 (cond
  ( (not newctr)
      (setq newctr (getpoint "\nPick new center: "))
      (setq hseg height)
  )
  ( (and (< (car newctr)(car center))(< (cadr newctr)(cadr center)))
    (setq newctr (mid center ll))
  )
  ( (and (< (car newctr)(car center))(> (cadr newctr)(cadr center)))
    (setq newctr (mid center ul))
  )
  ( (and (> (car newctr)(car center))(< (cadr newctr)(cadr center)))
    (setq newctr (mid center lr))
  )
  ( (and (> (car newctr)(car center))(> (cadr newctr)(cadr center)))
    (setq newctr (mid center ur))
  )
 )
(command "zoom" "c" newctr hseg)
)
The program is written with comments to group parts of the program together visually. The first group establishes several variables. It finds the current view center point, the view height in drawing units, and the views height to width ratio. Based on this ratio, it finds the width of the current view in drawing units. It also finds the values for half the width and height (see figure 8.8).
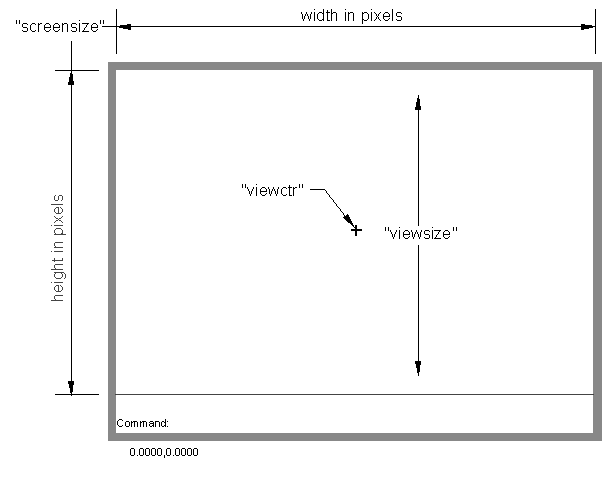
Figure 8.8: Finding the current screen properties
The next group establishes the four corner points of the current view. This is done by taking the center point of the view and adding and subtracting x and y value for each corner (see figure 8.9).
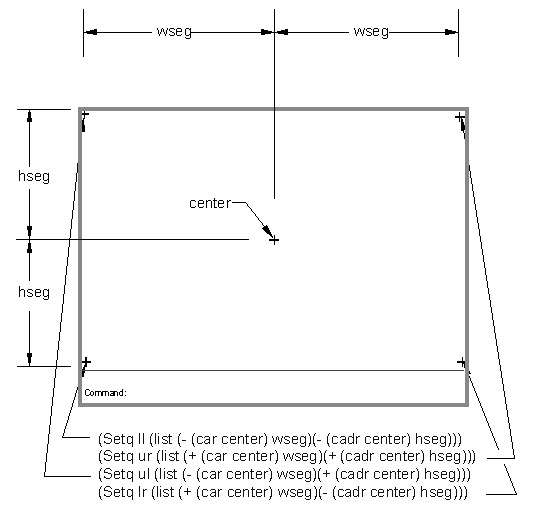
Figure 8.9: Finding the current displays four corner coordinates.
The next group draws the lines that divides the screen into quadrants (see Figure 8.10). Looking a the first line, you can see the grdraw function:
(grdraw center (polar center pi wseg) -1 1)
The syntax for grdraw is:
(grdraw [from point][to point][color code][optional highlight code])
The lines grdraw draws act like blips. As soon as you issue any command that changes the display, including redraws, the lines disappear. The first and second arguments to grdraw determine the endpoints of the temporary line. The third argument is the color code. This code is an integer value that represents the color you want the line to have. If the color code is -1, then the line will be drawn in a color that compliments its background. This ensures that the line will be seen. The fourth argument is optional. Whenever it is a integer other than 0 the line will be drawn highlighted. This usually means in a dotted pattern similar to that shown in a crossing window.
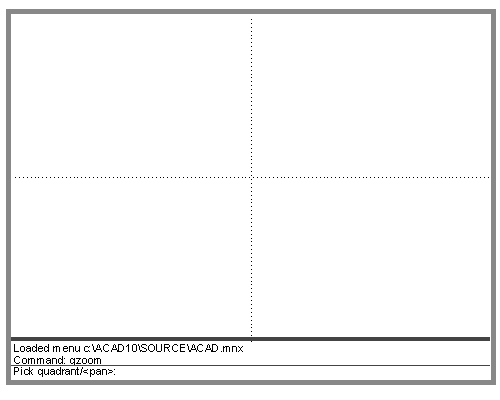
Figure 8.10: The quadrants drawn on the screen
In the C:QZOOM program, grdraw draws lines from the center of the current view out toward the four sides of the screen. The -1 color code is used so the color of the lines is opposite to the background color. Finally, the highlight option is used by supplying a 1 as a fourth argument.
The last group of expressions does the work of reading the pick point from the user and determining which quadrant to enlarge.
Virtually every AutoCAD command offers a default value. For example, the line command will continue a line from the last point selected if no point is selected at the First point prompt. Defaults can be a great time saver especially when the user is in a hurry. In this section, you will see first hand how you can add defaults to your own programs.
Adding Default Responses to your Program
In the C:QZOOM program, a default response was added. If the user presses return without picking a point, the program goes into a pan mode allowing the use to select a new view center. By giving the user the pan option in this way, the program becomes easier to use and more flexible. Other AutoCAD commands also provide default values for options. For example, the offset command will offer the last offset distance as a default value for the current offset distance. If the user decides he or she can use that value, he or she only needs to press return to go on to the next part of the command.
You can incorporate similar functionality into your programs by using global variables. Figure 8.11 shows the sequential number program created in chapter 5 with code added to include a default value for the number spacing.
(defun C:SEQ (/ pt1 currnt last spc)
(if (not *seqpt)(setq *seqpt 2.0))                ;setup global default
(setq pt1    (getpoint "\nPick start point: "))       ;get start point
(princ "\nEnter number spacing <")                ;first part of prompt
(princ *seqpt)                                      ;print default part of prompt
(setq spc    (getdist pt1 ">: "))                     ;finish prompt - get spac'g
(setq currnt (getint "\nEnter first number: "))       ;get first number
(setq last   (getint "\nEnter last number: "))        ;get second number
(if (not spc)(setq spc *seqpt)(setq *seqpt spc));set global variable
(setq stspc  (rtos spc 2 2))                          ;convert spacing to string
(setq stspc  (strcat "@" stspc "<0" ))                ;create spacing string
(command "text" pt1 "" "" currnt)                     ;place first number
  (repeat (- last currnt)                             ;start repeat 'till last
    (setq currnt (1+ currnt))                         ;add 1 to current number
    (command "text" stspc "" "" currnt)               ;place text
  )                                                   ;end repeat
)                                                     ;end defun
Make the changes to your copy of the C:SEQ program so it looks like figure 8.11. Open a new file in AutoCAD, load the newly modified C:SEQ program, and then run it. The program will run as it has before but it now offers a default value of 2.0 at the Enter number spacing prompt:
Enter number spacing <2.0>:
Press return at this prompt. The default value of 2.0 will be applied to the number spacing. If you enter a different value, .5 for example, this new value becomes the default. The next time you run the program, .5 will appear as the default value for the number spacing:
Enter number spacing <0.5>:
There are actually several expressions that are added to make this default option possible. First is a conditional expression that test to see if a global variable called *seqpt is non-nil:
(defun C:SEQ (/ pt1 currnt last spc)
(if (not *seqpt)(setq *seqpt 2.0))
It its' value is nil, it is given the value of 2.0. This is just an arbitrary value. You can make it anything you like.
Next, the user is prompted to pick a point just as in the previous version of the program:
(setq pt1 (getpoint "\nPick start point: "))
The next set of expressions does the work of displaying the default value to the AutoCAD prompt.
(princ "\nEnter number spacing <")
(princ *seqpt)
(setq spc (getdist pt1 ">: "))
The prompt is broken into three parts. The first expression above prints everything before the default value. The second expression prints the default value. The third expression uses the getdist function to obtain a new distance value from the user. The end of the prompt is included as the prompt string to the getdist function. The net result is a single line appearing at the AutoCAD prompt (see figure 8.12).
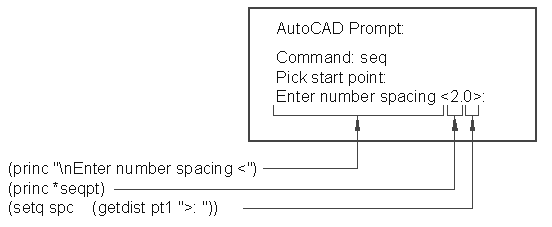
Figure 8.12: Using princ to construct a prompt
The next two lines are unchanged from the earlier version of the program:
(setq currnt (getint "\nEnter first number: "))
(setq last (getint "\nEnter last number: "))
The next line is a new conditional expression that tests to see if a value was entered at the Enter number spacing prompt:
(if (not spc)(setq spc *seqpt)(setq *seqpt spc))
This expression test the variable spc to see if it value is non-nil. If it is nil, indicating the user pressed return without entering a value, spc is assigned the value of the global variable *seqpt. This is the default value that appears in the Enter number spacing prompt. If spc does have a value, then its value is assigned to *seqpt thus making the value of spc the new default value.
The rest of the program is unchanged:
(setq stspc (rtos spc 2 2))
(setq stspc (strcat "@" stspc "<0" ))
(command "text" pt1 "" "" currnt)
(repeat (- last currnt)
(setq currnt (1+ currnt))
(command "text" stspc "" "" currnt)
)
)
You may wonder why the global variable *seqpt starts with an asterisk. Names given to global variables don't have to be different from other symbol but you may want to set them off by preceding them with an asterisk. This is a convention used in Common LISP which we have carried over to AutoLISP.
Creating a Function to Handle Defaults
If you find that many of your programs utilize defaults, it may be worthwhile to create a function that creates the default prompts for you. Figure 8.13 Shows the C:SEQ program with a function added to handle default prompts.
(defun deflt (str1 def)
(strcat str1 " <" (rtos def 2 4) ">: ")
)


(defun C:SEQ (/ pt1 currnt last spc)
(if (not *seqpt)(setq *seqpt 2.0))               ;setup global default
(setq pt1    (getpoint "\nPick start point: "))
(setq spc    (getdist (deflt "\nEnter spacing" *seqpt)))
(setq currnt (getint "\nEnter first number: "))
(setq last   (getint "\nEnter last number: "))
(if (not spc)(setq spc *seqpt)(setq *seqpt spc)) ;set global variable
(setq stspc  (rtos spc 2 2))
(setq stspc  (strcat "@" stspc "<0" ))
(command "text" pt1 "" "" currnt)
  (repeat (- last currnt)
    (setq currnt (1+ currnt))
    (command "text" stspc "" "" currnt)
  )
)
Figure 8.13: The C:SEQ program with a default handling function.
The function deflt takes two arguments. The first is the beginning text of the prompt and the second is the default value.
(defun deflt (str1 def / lunts)
(setq lunts (getvar "lunits"))
(strcat str1 " <" (rtos def lunts 4) ">: ")
)
The arguments are concatenated to form a single string which is the value returned by the function. Since the default value is a real data type, it is converted to a string using the rtos function. The getvar expression at the beginning of the function finds the current unit style which is used in the rtos function to control the unit style created by rtos.
The C:SEQ function uses this function in the expression:
(setq spc (getdist (deflt "\nEnter spacing" *seqpt)))
Here, the function is place where the prompt string normally appears in a getdist expression. When deflt is evaluated, it returns the string:
"\nEnter spacing <2.0000>: "
This string is then supplied to the getdist function as the prompt string argument.
The C:SEQ program still requires the two conditional expressions that were added earlier:
(if (not *seqpt)(setq *seqpt 2.0))
.
.
.
(if (not spc)(setq spc *seqpt)(setq *seqpt spc)) ;set global
But without increasing the amount of code, we are able to make a simpler and more flexible system to add prompts to our programs. An added benefit is a more readable program.
Dealing with Aborted Functions
If you are writing programs for yourself, you may not be too concerned with how the program looks or behaves. But if you start to write programs for others to use, you have to start thinking about ways of making your programs more error proof. You should provide ways of easily exiting your program without creating problems for the unfamiliar user. Error handling, as it is often called, is writing your program to include code that anticipates any possible input errors the user might come up with. Fortunately, most of AutoLISPs get functions have some error handling capabilities built in. If you enter a string when a get function expects a point, you will get a message telling you that a point is expected.
But the most common error handling problem you will encounter is the aborted program. We can get an idea of how an aborted program can affect a users work by using the C:BREAK2 program from chapter 6.
Open an AutoCAD file and load the C:BREAK2 program. Start C:BREAK2 by entering break2 at the command prompt. At the prompt:
Select object:
press the Ctrl-C key combination to abort the program. Now any time you use your cursor to select a point or object, you will get the "nearest" osnap override. This because you aborted the program before it was able to set the osnap mode back to none (see figure 8.14).

Figure 8.14: What happens when C:BREAK2 is aborted
To deal with problems like this, you can use a special AutoLISP function called *error*. If a function is created using *error* as its name, it is evaluated whenever an error occurs. Figure 8.15 shows the Break2.lsp file with the addition if an *error* function. Open the Break2.lsp file and add the *error* function shown in figure 8.16.
(defun *error* (msg)
(setvar "osmode" 0)
(princ msg)
(princ)
)


(defun c:break2 (/ pt1 pt2 pt3 pt4 pt0 ang1 dst1)
   (setvar "osmode" 512)                               ;near osnap mode
   (setq pt1 (getpoint "\nSelect object: "))           ;get first break point
   (setq pt2 (getpoint pt1 "\nEnter second point: "))  ;get second break point
   (setvar "osmode" 128)                               ;perpend osnap mode
   (Setq pt3 (getpoint pt1 "\nSelect parallel line: "));get 2nd line
   (Setvar "osmode" 0)                                 ;no osnap mode
   (setq ang1 (angle pt1 pt3))                         ;find angle btwn lines
   (setq dst1 (distance pt1 pt3))                      ;find dist. btwn lines
   (setq pt4 (polar pt2 ang1 dst1))                    ;derive pt4 on 2nd line
      (command
            "break" pt1 pt2                            ;break 1st line
            "break" pt3 pt4                            ;break 2nd line
            "line" pt1 pt3 ""                          ;close ends of lines
            "line" pt2 pt4 ""
      )
)
Save the file go back to the AutoCAD file. Be sure that osnap is set to "none". Load and start the C:Break2 program. Again, at the Select object prompt, enter a Ctrl-C.
Now, instead of leaving the osnap mode in the "nearest" setting, the *error* function returns the osnap setting back to "none". It also prints the message:
Function cancelled
Lets look at this function to see exactly how it works. The first line looks like a typical defun expression:
(defun *error* (msg)
The argument list contains the symbol msg. *error* accepts as an argument, an error message. This error message is the one that appears normally without the *error* function. In the next line:
(setvar "osmode" 0)
the osnap mode is set back to 0. Next, the error message supplied by AutoLISP is printed to the AutoCAD prompt:
(princ msg)
The last princ prevents the error message from appearing twice in the prompt.
This works very nicely assuming that you always have osnap set to "none". But suppose your osnap setting varies during your editing session and you want your function to return to whatever the current setting is at the time a program is issued. Figure 6.16 shows the Break2 program again with some additional code that helps restore the osnap setting to its previous setting regardless of what it may have been.
(defun *error* (msg)
(setvar "osmode" *osnap)
(princ msg)
(princ)
)


(defun c:break2 (/ pt1 pt2 pt3 pt4 pt0 ang1 dst1)
   (setq *osnap (getvar "osmode"))
   (setvar "osmode" 512)                               ;near osnap mode
   (setq pt1 (getpoint "\nSelect object: "))           ;get first break point
   (setq pt2 (getpoint pt1 "\nEnter second point: "))  ;get second break point
   (setvar "osmode" 128)                               ;perpend osnap mode
   (Setq pt3 (getpoint pt1 "\nSelect parallel line: "));get 2nd line
   (Setvar "osmode" *osnap)                            ;no osnap mode
   (setq ang1 (angle pt1 pt3))                         ;find angle btwn lines
   (setq dst1 (distance pt1 pt3))                      ;find dist. btwn lines
   (setq pt4 (polar pt2 ang1 dst1))                    ;derive pt4 on 2nd line
      (command
            "break" pt1 pt2                            ;break 1st line
            "break" pt3 pt4                            ;break 2nd line
            "line" pt1 pt3 ""                          ;close ends of lines
            "line" pt2 pt4 ""
      )
)
The line:
(setq *osnap (getvar "osmode"))
is added to the beginning of the program. This creates a global variable *osnap which holds the osnap code that determines the current osnap setting. The expression that returns the osnap mode to "none":
(setvar "osmode" 0)
is replaced by one that sets the osnap mode to whatever was saved as *osnap:
(setvar "osmode" *osnap)
This same expression appears in the *error* function so in the event of a cancellation by the user, the osnap mode is set back to its previous setting.
Organizing Code to Reduce Errors
The error handling function shown here as an example could be incorporated into your Acad.lsp file so it is available for any AutoLISP error that may occur. You can also enlarge it to include other settings or variables that may require resetting. But the way a program is organized can affect the impact an error has. For example, we could have written the C:SEQ program in a slightly different way. Figure 8.17 shows the program with its expressions in a slightly different order.
(defun deflt (str1 def)
(strcat str1 " <" (rtos def 2 4) ">: ")
)


(defun C:SEQ (/ pt1 currnt last spc)
(if (not *seqpt)(setq *seqpt 2.0))               ;setup global default
(setq pt1    (getpoint "\nPick start point: "))
(setq spc    (getdist (deflt "\nEnter spacing" *seqpt)))
(if (not spc)(setq spc *seqpt)(setq *seqpt spc)) ;set global variable
(setq currnt (getint "\nEnter first number: "))
(setq last   (getint "\nEnter last number: "))
(setq stspc  (rtos spc 2 2))
(setq stspc  (strcat "@" stspc "<0" ))
(command "text" pt1 "" "" currnt)
  (repeat (- last currnt)
    (setq currnt (1+ currnt))
    (command "text" stspc "" "" currnt)
  )
)
The conditional expression:
(if (not spc)(setq spc *seqpt)(setq *seqpt spc))
immediately follows the expression that prompts for the spacing distance. This placement seems to be a natural place for this expression since it immediately sets the variable spc or *seqpt to a value once the value of spc is obtained. But what happens if the user decides to cancel the program after this expression is evaluated. If the user inputs a new value for the number spacing, then the global variable *seqpt holds that new value even though the program has been canceled. The next time the user uses the C:SEQ program, the value that was entered previously is the new default value. Even though the program was cancelled the value entered for the number spacing became the new default.
This may or may not be a problem but for many, issuing a cancel means canceling the affects of any data entry made during the command. So to avoid having the global variable *seqpt changed when the program is cancelled, the conditional expression is moved to a position after all the prompts are issued. This way, the user can cancel the program with no affect to the *seqpt variable.
While we are on the subject of errors, We should discuss the debugging of your programs. As you begin to write programs on your own, you will probably not get them right the first time. Chances are, you will write a program then run it only to find some error message appear. Then you must review your program to try and find the offending expression.
Most of the time, errors will be due to the wrong number of parentheses or the wrong placement of parentheses within your program. If this is the case, you usually get the error message:
error: malformed list
or
error: extra right paren
There aren't any simple solutions to this problem other than checking your program very carefully for number and placement of parentheses. Perhaps the best thing to do is to print out your program. It is often easier to spot errors on paper than it is to spot them on your computer screen.
Since a misplaces paren can cause a variety of problems, printing out your program and checking the parentheses placement is the best start.
Another common error is to mis-spelled symbols. This is especially a problem with confusing lower case l's with 1's and zeros with o's. The full range of typos is possible and often hard to detect. Again, the best solution is to print out your program and take a careful look.
If you get the message:
error: Insufficient string space
chances are, you didn't provide a closing double quote in a string value as in the following:
(menucmd "p1=* )
Also, prompt strings cannot exceed 100 characters.
Finally, it is common to try to apply a wrong data type to a function. We have mentioned that one common error is to give a variable a string value which happens to be a number:
(setq str1 "1")
Later, you might attempt to use this string as an integer in another function:
(1+ str1)
This results in a bad argument type error.
For your convenience, we have included appendix B that contains the AutoLISP error messages and their meaning. You may want to refer to it as you debug your programs.
Using Variables as Debugging Tools
AutoLISP helps you find errors by printing to the screen the offending expression along with the error message. But sometimes this is not enough. If you find you are having problems with a program, you can check the variables in the program using the exclamation point to see what values they have obtained before the program aborted. If you have an argument list, you may want to keep it empty until you finish debugging your program. That way, you can check the value of the programs's variables. Otherwise, the values of the variables will be lost before you have a chance to check them.
If you have a particularly lengthy program, you can use the princ function to print variables to the prompt line as th program runs. By placing the princ function in strategic locations within your program, you can see dynamically what your variables are doing as the program runs. You can also have the princ function print messages telling you where within your program it is printing from.
As you begin to write you own program, many of the issues brought to light in this chapter will confront you. We hope that by introducing these topics now, you will have a better grasp of what is required in a program design. By knowing what is possible within AutoCAD, you can develop programs that simplify the users efforts.