Chapter 10: Editing AutoCAD objects
Finding the Number of Objects in a Selection Set
Using Cmdecho to speed up your programs
Improving speed through direct database access
Filtering Objects for Specific Properties
Selecting Objects Based on Properties
In the last chapter you were introduced to the ssname and entget functions that, together with ssget, allowed you to extract information about an object from the drawing database. In this chapter, you will learn how to perform operations on several objects at once. Also, you will look at how to obtain information regarding a drawing's table information which consists of layers and their settings, viewport, UCSs and other system options.
There are actually several functions that allow you to access the AutoCAD drawing database directly. Table Lists the functions and gives a brief description of each.
|
Function |
Description |
|
(entnext [object name]) |
If used with no argument, entnext will return the object name of the first object in the database. If an object name is given as an argument, entnext returns the first sub-object of object name. A sub-object is an object contained in a complex object such as a polyline vertex or a block attribute. |
|
(entlast) |
Returns the object name of the last object added to the drawing database. |
|
(entsel [prompt]) |
Prompts the user to select an object then returns a list whose first element is the object's name and whose second element is the pick point used to select the object. A prompt can be optionally added. If no prompt is used, the prompt "Select object:" is given automatically. |
|
(handent handle) |
Returns an object name given an object's handle. |
|
(entdel object name) |
Deletes object name. If object has previously been deleted in the current editing session, then the object named will be restored. |
|
(entget object name) |
Returns the property list of object name |
|
(entmod property list) |
Updates the drawing database record of the object whose object name appears in the property list. The object name is the -1 group code sublist of the property list. |
|
(entupd object name) |
Updates the display of polyline vertices and block attributes that have been modified using entmod. |
You have already seen first hand how a few of these functions work. In this and the following chapter, you will explore the use of several more of these very powerful editing tools.
The Edtxt program you looked at in the last chapter used ssget to obtain a single object. However, ssget is really better suited to obtaining multiple sets of objects. You can use groups of objects collected together as selection sets to perform some operation on them all at once.
To examine methods for editing multiple objects, we will look at a program that offers an alternate to the Extend command. Though Extend allows you to extend several objects, you have to pick each object individually. Picking objects individually allows for greater flexibility in the type of object you can extend and the location of the extension. However, there are times when you will want to perform a multiple extend operations like extending several lines to a another line.
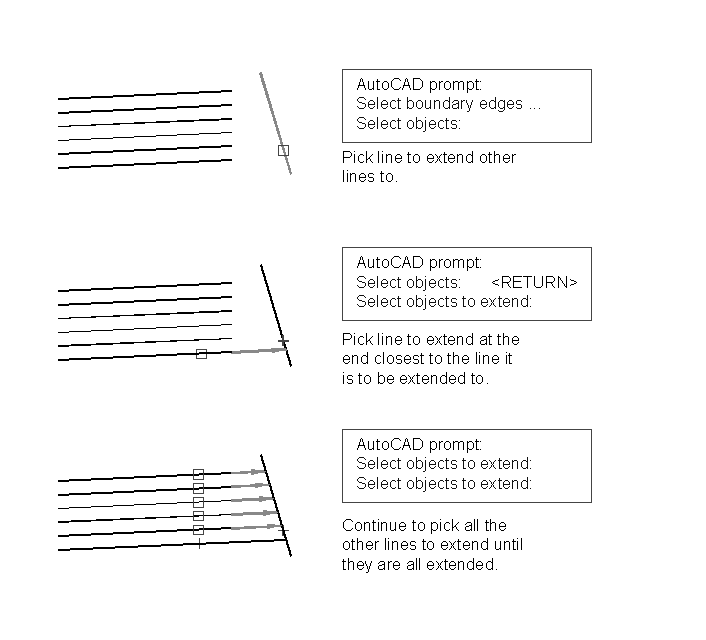
You can use AutoLISPs' ssget function to help you
simplify the processing of multiple objects. Figure 10.1 shows a
sketch of how a multiple extend program might work manually and
Figure 10.2 shows the actual program derived from that sketch.
;Program to extend multiple lines - Mlext.lsp  -------------------------------

(defun c:MLEXT (/ x y sset1 count pt1 pt2 int obj elst)
(graphscr)                                             ;shift to graphics
(princ "\nSelect Boundary edge...")                    ;print prompt
(setq obj (car (entsel)))                              ;Get entity name
(setq x (getpoint "\nPick axis crossing lines to extend: "))
(setq y (getpoint x "\nPick endpoint: "))              ;get axis crossing lines
          (setq sset1 (ssget "c" x y))                 ;get entities to extend
          (setq count 0)                               ;set counter
             (if (/= sset1 nil)                        ;test for selection set
                 (while (< count (sslength sset1))     ;while still select. set
                     (setq elst (entget (ssname sset1 count))  ;get entity name
                           pt1  (cdr (assoc 10 elst))  ;get one endpoint
                           pt2  (cdr (assoc 11 elst))  ;get other endpoint
                           int  (inters x y pt1 pt2)   ;find intersection
                     );end setq                         of axis and line
                     (command "extend" obj "" int "")  ;command to extend line
                     (setq count (1+ count))           ;go to next line count
                 );end while
             );end if
);end defun
1. Open a file called Mlext.lsp and copy the program from figure 10.2 into your file. Start AutoCAD and open a new file called chapt10. Remember to add the equal sign at the end of the file name.
2. Draw the drawing shown in figure 10.3. The figure indicates the coordinate location of the endpoints so you can duplicate the drawing exactly. Do not include the text indicating the coordinates.
3. Load the Mlext.lsp file and enter mlext at the command prompt. When you see the prompt
Select boundary edges...
Select object:
pick the line labeled boundary edge in figure 10.3. At the next prompt
Pick axis crossing lines to extend:
4. A rubber banding line representing the crossing axis appears. Pick a point at coordinate 8,2. You can use on the snap mode and dynamic coordinate readout to help you locate this point.
5. At the next prompt
Pick endpoint:
pick a point at coordinate 8,9. The lines that are crossed by the axis are extended to the boundary edge line. Lets look at how this program works.

Figure 10.3: Lines drawn in the chapt10 file
Let's look at how this program works. The first expression in the program is:
(graphscr)
This simply flips the display to the graphics screen in case the user is currently in Text mode. Another function called Textscr does just the opposite. It flips the display into text mode if the current screen is in a graphics mode.
Next, the Mlext finds the line used to extend to:
(princ "\nSelect boundary edge...")
(setq obj (car (entsel)))
Here we use entsel to obtain the object name. Since entsel returns a two element list containing the name and pick coordinate, we use car to extract the object name from the list. Also note that we use a prompt similar to the one used by the extend command.
The next several lines creates a selection set of lines to extend:
(setq x (getpoint "\nPick axis crossing lines to extend: "))
(setq y (getpoint x "\nPick endpoint: "))
(setq sset1 (ssget "c" x y))
Here two points are obtained indicating an axis along which the lines to be extended lie. These points will be used later to help find other pick points. Then ssget is used with the crossing option to create a selection set. The two points defining the axis are used as the two corner points of the crossing window.
The next two lines do some setup work:
(setq count 0)
(if (/= sset1 nil)
The first of these two lines set a counting variable to zero. The next line checks to make sure a set of objects has indeed been selected and a selection set created.
Once these things have been established, the actual work is done:
(while (< count (sslength sset1))
(setq elst (entget (ssname sset1 count))
(setq pt1 (cdr (assoc 10 elst)))
(setq pt2 (cdr (assoc 11 elst)))
(setq int (inters x y pt1 pt2))
(command "extend" obj "" int "")
(setq count (1+ count))
);end while
This while expression is evaluated until the counter variable count reaches the total number of objects in the selection set sset1. Each time the expression is evaluated, count is increased by one until count equals the length of the selection set. Lets look at what each iteration of the while expression does.
Finding the Number of Objects in a Selection Set
First, the while expression checks to see if the counting variable count is less than the total number of elements in the selection set sset1. This is done through the sslength function:
(while )< count (sslength ssget1))
Sslength simply returns the number of objects in its selection set argument. The argument can be the actual selections set or a symbol representing it. In our example, the symbol ssget1 is used. If count is less than the number of objects, we know that we haven't processed all the objects in the selection set, in which case, the expressions that follow are evaluated.
Next, the variable elst is given the object name of an object in the selection set:
(setq elst (entget (ssname sset1 count)))
The count variable is used by ssname to determine which object in the selection set sset1 is to be examined. Entget then extracts the property list for that object and this list is assigned to the variable elst.
Next, the two endpoints of the objects are extracted:
(setq pt1 (cdr (assoc 10 elst)))
(setq pt2 (cdr (assoc 11 elst)))
Here the Assoc function is used to extract the two endpoint coordinates from the property list. The group codes 10 and 11 are used by Assoc to locate the sublist in elst containing the coordinates in question (see appendix C for a full list of group codes and their meaning). These coordinates are assigned to variables pt1 and pt2.
Once the endpoint's coordinates are found, a function called inters is used to find the intersection point of the current object being examined and the object crossing axis derived in the beginning of the function:
(setq int (inters x y pt1 pt2))
Inters is a function finds the intersecting point of two pairs of coordinates. Inters syntax is:
(inters x1 y1 x2 x2 )
where x1 and y1 are the x and y coordinates of one axis and x2 and y2 are the coordinates of the second axis. Inters returns a list containing the coordinates of the intersection of the two axes. In the Mlext program, this list is assigned to the variable int.
Finally, the command function is used to invoke the extend command and extends the current object:
(command "extend" obj "" int "")
The first thing that the extend command asks for is the line to extend to. Here, obj is used to indicate that line. A return is issued to end the selection process then a point value is entered to indicate both the line to be extended and the location of the extend side. In this case, the intersection point of the line and the extend axis is used for this purpose. Finally, a return is issued to end the extend command.
The last line in the while expression increases the value of count by one in preparation to get the next object in the selection set.
(setq count (1+ count))
If count is still less than the number of objects in the selection set, the process repeats itself.
Since the Extend and Trim commands work in a nearly identical way, you can create a program that performs both multiple extends or trims on lines by changing just a few elements in the Mlext program. Figure 10.4 shows such a program called Etline. The elements that are changed from Mlext are indicated in the comment.
;program to extend or trim multiple lines --Etline.lsp------------------------

(defun c:ETLINE (/ x y u sset1 count pt1 pt2 int obj)
(graphscr)                                             ;shift to graphics
(initget "Extend Trim")                          ;ADDED set keywords
(setq EorT (getkword "\Extend or <Trim>: "))     ;ADDED select operation
(if (equal EorT "")(setq EorT "Trim"))           ;ADDED test operation choice
(princ "\nSelect boundary edge...")                    ;print prompt
(setq obj (car (entsel)))                              ;Get entity name
(setq x (getpoint "\nPick axis crossing lines to edit: "))
(setq y (getpoint x "\nPick endpoint: "))              ;get axis crossing lines
          (setq sset1 (ssget "c" x y))                 ;get entities to extend
          (setq count 0)                               ;set counter
             (if (/= sset1 nil)                        ;test for selection set
                 (while (< count (sslength sset1))     ;while still select. set
                     (setq elst (entget (ssname sset1 count))  ;get entity name
                           pt1  (cdr (assoc 10 elst))  ;get one endpoint
                           pt2  (cdr (assoc 11 elst))  ;get other endpoint
                           int  (inters x y pt1 pt2)   ;find intersection
                     );end setq                         of axis and line
                     (if (equal EorT "Extend")   ;ADDED Test for extend choice
                      (command "extend" obj "" int "") ;extend line or...
                      (command "trim" obj "" int "");ADDED trim line
                     );end if
                     (setq count (1+ count))           ;go to next line count
                 );end while
             );end if
);end progn
Figure 10.4: Program to perform both extend an trim functions
When you begin to write program that act on several objects in a recursive fashion, speed begins to be an issue. There are two things you can do to improve the speed of such recursive program. The first is to simply set the cmdecho system variable to 0. the second is to modify the drawing database directly rather than rely on AutoCAD commands to make the changes for your. In this section, you will look at both options first hand.
Using Cmdecho to Speed up Your Program
You may have noticed that when you ran the mlext program, the commands and responses of each line edit appeared in the command prompt. The program is actually slowed by having to wait for AutoCAD to print its' responses to the prompt line. You can actually double the speed of the Mlext program by simply adding the following expression at the beginning of the program:
(setvar "cmdecho" 0)
Cmdecho is an AutoCAD system variable that controls the echo of prompts to the command prompt. When set to zero, it will suppress any AutoCAD command prompts that would normally occur when AutoLISP invokes an AutoCAD command.
Open the Mlext.lsp file and add the above line to the program. Also include the following line at the end of your program to set the cmdecho variable back to 1.
(setvar "cmdecho" 1)
Your file should look like figure 10.5. This figure shows the Mlext program with the changes indicated by comments.
;Program to extend multiple lines - Mlext.lsp  -------------------------------

(defun c:MLEXT (/ x y u sset1 count pt1 pt2 int obj)
(graphscr)                                             ;shift to graphics
(setvar "cmdecho" 0)                           ;ADDED   echo to prompt off
(princ "\nSelect Boundary edge...")                    ;print prompt
(setq obj (car (entsel)))                              ;Get entity name
(setq x (getpoint "\nPick axis crossing lines to extend: "))
(setq y (getpoint x "\nPick endpoint: "))              ;get axis crossing lines
          (setq sset1 (ssget "c" x y))                 ;get entities to extend
          (setq count 0)                               ;set counter
             (if (/= sset1 nil)                        ;test for selection set
                 (while (< count (sslength sset1))     ;while still select. set
                     (setq elst (entget (ssname sset1 count))  ;get entity name
                           pt1  (cdr (assoc 10 elst))  ;get one endpoint
                           pt2  (cdr (assoc 11 elst))  ;get other endpoint
                           int  (inters x y pt1 pt2)   ;find intersection
                     );end setq                         of axis and line
                     (command "extend" obj "" int "")  ;command to extend line
                     (setq count (1+ count))           ;go to next line count
                 );end while
             );end if
(setvar "cmdecho" 1)                           ;ADDED   echo to prompt back on
);end defun
Figure 10.5: The Mlext.lsp file with the additions made.
Next, go back to the Chapt10 drawing and re-create the drawing in figure 10.3. Load and run the Mlext program as you did previously. Notice that it runs much faster and that the extend command prompts no longer appear at the command prompt. Setting Cmdecho to zero will improve the speed of any program that executes AutoCAD commands recursively.
Improving Speed Through Direct Database Access
Another method for improving speed is to make your program modify the drawing database directly instead of going through an AutoCAD command. Figure 10.6 shows a modified version of the Mlext program that does this.
;Function to find closest of two points---------------------------------------
(defun far ( fx fy dlxf / dst1 dst2 intx)
    (setq dst1 (distance dlxf fx))                  ;find distnce to one pt
    (setq dst2 (distance dlxf fy))                  ;find distnce to other pt
    ;If 1st pt.is farther than 2nd pt then eval 1st pt........
    (if (> dst1 dst2) fx fy )
)


;Proram to extend multiple lines -- Mlext2.lsp
;-----------------------------------------------------------------------------
(defun c:MLEXT2 (/ sset1 count pt1 pt2 int OBJ objx objy
                   elst int far1 sub1 sub2)
 (graphscr)
 ;Get entity list of line to be extended to then find endpoints..........
 (princ "\nSelect boundary edge...")                         ;print prompt
 (Setq obj (entget (car (entsel)))                           ;get boundary
       objx (cdr (assoc 10 obj))                             ;get 1st endpoint
       objy (cdr (assoc 11 obj))                             ;get 2nd endpoint
       sset1 (ssget)                                         ;get lines to trim
       count 0
 )                                                           ;set count to zero
    ;IF lines have been picked.........
    (if (/= sset1 nil)
        ;As long as count is less than number of objects in selection set...
        (while (< count (sslength sset1))
               ;Get intersect of two lines and find farthest endpt of line ...
               (setq elst (entget (ssname sset1 count))      ;get entity list
                     pt1  (cdr (setq sub1 (assoc 10 elst)))  ;get 1st endpoint
                     pt2  (cdr (setq sub2 (assoc 11 elst)))  ;get 2nd endpoint
                     int  (inters objx objy pt1 pt2 nil)     ;find interects
                     far1 (far pt1 pt2 int)                  ;find far point
               )
               ;IF pt1 equals point farthest from intersect..........
               (if (= far1 pt1)
                   (entmod (subst (cons 11 int) sub2 elst))  ;update pt2
                   (entmod (subst (cons 10 int) sub1 elst))  ;else update pt1
               );end IF 2
               (setq count (1+ count))                       ;add one to count
        );end WHILE
    );end IF 1
);END of defun
Figure 10.6: The Mlext2 program that directly modifies the drawing database.
In this section you'll enter the modified program, and then use the Chapter 10 drawing to see how the program works.
1. Exit the Chapt10 drawing and open an AutoLISP file called Mlext2.lsp.
2. Copy the program in figure 10.6 into the file. Save and exit Mlext2.lsp.
3. Return to the Chapt10 drawing. Once again, reconstruct the drawing shown in figure 10.3.
4. Load and run Mlext2.lsp.
5. At the first prompt:
Select boundary edges...
Select object:
6. Pick the boundary edge line indicated in figure 10-3. At the next prompt:
Select objects:
enter a C to use a crossing window.
7. Pick the two points indicated in figure for the corners of the crossing window. The lines will extend to the boundary edge line.
Notice that the extension operation occurred much faster than before. Since the program doesn't have to go through an extra level of processing, namely the AutoCAD Extend command, the operation occurs much faster. Lets look at how the program was changed to accomplish the speed gain.
You might first notice the function far added to the program file. We will look at this function a bit later. The beginning of the program shows some immediate changes.
(defun c:MLEXT2 (/ sset1 count pt1 pt2 int OBJ objx objy
elst int far1 sub1 sub2)
(graphscr)
(princ "\nSelect boundary edge...")
(Setq obj (entget (car (entsel)))
(setq objx (cdr (assoc 10 obj)))
(setq objy (cdr (assoc 11 obj)))
Instead of simply obtaining the object name of the boundary edge line, we extract the endpoint coordinates of that line and set the coordinates to the variables objx and objy. These endpoints are used later in conjunction with the inters function to find the exact point to which a line must be extended.
Next, we obtain a selection set of the lines to be changed using ssget without any arguments:
(setq sset1 (ssget))
Remember that when you use ssget in this way, the user is allowed to select the method of selection just as any select object prompt would. The user can use a standard or crossing window, pick objects individually, or selective remove or add objects to the selection set. In our exercise, you were asked to enter a C for a crossing window to select the lines.
This is followed by an if conditional expression to test if objects have been selected.
(if (/= sset1 nil)
The following while expression then does the work of updating the drawing database for each line that was selected. Just as with the Mlext program, the while expression checks to see if the value of count is less than the number of objects in the selection set. It then finds the object list for one of the lines and derives the two endpoints of that line.
(while (< count (sslength sset1))
(setq elst (entget (ssname sset1 count)))
(setq pt1 (cdr (setq sub1 (assoc 10 elst))))
(setq pt2 (cdr (setq sub2 (assoc 11 elst))))
This part is no different from Mlext. But the next line is slightly different from its corresponding line in Mlext.
(setq int (inters objx objy pt1 pt2 nil))
Here, inters is used to find the intersection between the line currently being examined and the boundary edge line. We see the two variables objx and objy used as the first two arguments to inters. These are the two endpoints of the boundary edge line derived earlier in the program. The variables pt1 and pt2 are the endpoints of the line currently being examined. A fifth argument, nil is added to the inters expression. When this fifth argument is present in an inters expression and is nil, then inters will find the intersection of the two pairs of coordinates even if they don't actually cross (see figure 10-7).
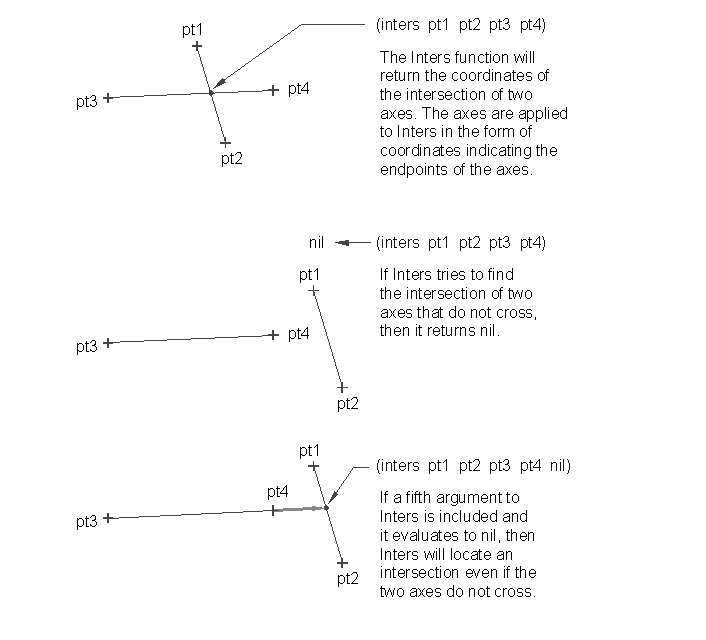
Figure 10-7: How the Inters function works
Inters treats the two lines as if they extended infinitely in both directions in order to find a point common to both lines. This feature is needed since the line being edited and the boundary edge line don't actually cross.
The next expression calls the user defined function far:
(setq far1 (far pt1 pt2 int))
This function finds which of two points is closest to a third point. The first two arguments to far are the points to be compared against the third argument which is the reference point. Far then returns the point that is farthest from the reference point. The result is that far finds the endpoint of the line that is the farthest from the intersection of the line and the boundary edge line. We will look at how far works later. For now lets continue with the main program.
Once the program finds the farthest of the two endpoints, the next three lines actually make the changes to the database.
(if (= far1 pt1)
(entmod (subst (cons 11 int) sub2 elst)) (entmod (subst (cons 10 int) sub1 elst))
);end IF 2
The conditional if expression checks to see if the farthest endpoint of the current line is equal to pt1. This test is done to determine which endpoint of the current object should be modified. We want the program to modify the endpoint closest to the intersection of the line and the boundary edge line so this test finds which endpoint is the one to change. If pt1 happens to be the equal to far1, therefore being farthest endpoint, then the sublist representing pt2 is modified. If pt1 proves not to be the farthest endpoint, then the sublist associated with it is modified.
Remember that subst replaces one list for another within an association list. Then endmod updates the drawing database record to reflect the new property list that is passes to it as an argument. The net result is the extension of a line to the boundary edge line.
The rest of the program adds one to the counter variable and the whole process is repeated until all the objects in the selection set have been processed. Since this program circumvents the AutoCAD Extend command and directly modifies the drawing database, it executes the changes to the lines objects much faster. However, to accomplish this extra speed, you must do some additional programming.
Now, lets briefly look at the far function. It is a fairly simple function that first obtains the distance between a reference point and two other points, then depending on which point yields the greater distance, the points value is returned. The value of far's three arguments are passed to the variables fx fy and dsfx. Fx and fy are the points in question and dsfx is the reference point:
(defun far ( fx fy dlxf / dst1 dst2 intx)
The function then finds the distance between fx and dlfx and assigns the value to dst1:
(setq dst1 (distance dlxf fx))
The same procedure is applied to fy:
(setq dst2 (distance dlxf fy))
Finally, the conditional if expression tests to see which distance is greater and returns a point value depending on the outcome:
(if (> dst1 dst2) fx fy )
Filtering Objects for Specific Properties
There are a number of other functions available that allow you to manipulate selection sets Table lists them and gives a brief description of what they do:
|
Function |
Description |
|
(ssadd [ent. name][s. set]) |
Creates a selection set. If used with no arguments, a selection set is created with no objects. If only an object name given as an argument, then a selection set is created that contains that object. If an object name and a selection set name is given, then the object is added to the selection set. |
|
(ssdel [ent. name][s. set]) |
Deletes an object from a selection set. ssdel then returns the name of the selection set. IF the object is not a member of the selection set, then ssdel returns nil. |
|
(sslength [s. set]) |
Returns the number of objects in a selection set. |
|
(ssmemb [ent. name][s. set]) |
Checks to see if an object is a member of a selection set. If it is, then ssmemb returns the name of the selection set. if not, then ssmemb returns nil. |
|
(ssname [s. set][nth object]) |
Returns the object name of a single object in a selection set. The second argument to ssname corresponds to the object's number within the selection set. The object numbers begin with zero and go to one minus the total number of objects in the selection set. |
You have already seen two of these functions, sslength and ssname, used in previous examples. Lets see how we can use ssadd to filter out object selections.
Figure 10-8 shows a function that is intended to filter out objects in a selection set based on layers. This function is useful where a group of objects are so close together that they are difficult to select, or in situations where several objects of different layers lie on top of each other and you want to select just the object on a specific layer. It returns a selection or object name depending on whether the filtered selection set contains only one item.
;function to filter entities by layer -- Lfilter.lsp--------------------------
(defun LFILTER (/ lay sset count ent newent)
    (setq lay (cons 8 (strcase (getstring "\nEnter layer name: "))))
    (setq sset (ssget))                              ;get entities
    (setq count 0)                                   ;set counter to zero
    (while (< count (sslength sset))                 ;while still select. set
      (setq lay2 (assoc 8 (entget(setq ent(ssname sset count))))) ;get layer
            (if (equal lay lay2)                     ;if layer matches entity
                (if (not newent)                     ;if new not select. set
                    (setq newent (ssadd ent))        ;make new select. set
                    (setq newent (ssadd ent newent)) ;else add to select. set
                );end if
            );end if
      (setq count (1+ count))
    );end while
   (if (= 1 (sslength newent))(ssname newent 0) newent) ;return select. set or
);end defun                                              entity name
Figure 10.8: The layer filtering program
Let's see first hand how this function works.
1. Open a file call Lfilter.lsp and copy the Lfilter program in figure 10.8. Save and exit the file.
2. Return to the AutoCAD Chapt10 drawing and erase any objects in the file.
3. Create the layers listed in table 10.1. Be sure to assign the line types indicated for each layer.
4. Draw the lines shown in figure 10.9. and assign each line to the layer shown directly to the right of each line. Use the coordinate and spacing information indicated in the drawing to place the lines.
5. Load the Lfilter program, then issue the erase command.
6. At the Select object prompt, enter:
(lfilter)
You will get the prompt:
Enter layer name:
8. Enter hidden. You will get the next prompt:
Select objects:
9. Enter C to use a crossing window and pick the points 2,1.25 for the lower left corner of the window and coordinate 8,8.25 for the upper right. The lines that pass through the crossing window will ghost. Press return after picking points. The lines will un-ghost then the prompt will return the number of objects found. The objects in the selection you just made with the crossing window that are on the layer hidden will ghost.
10. Press return. You have just erased only the items in your crossing window that were on the layer hidden.
11. Enter the Oops command in preparation for the next section.
|
Layer Name |
Linetype |
|
hidden |
hidden |
|
center |
center |
|
dashed |
dashed |
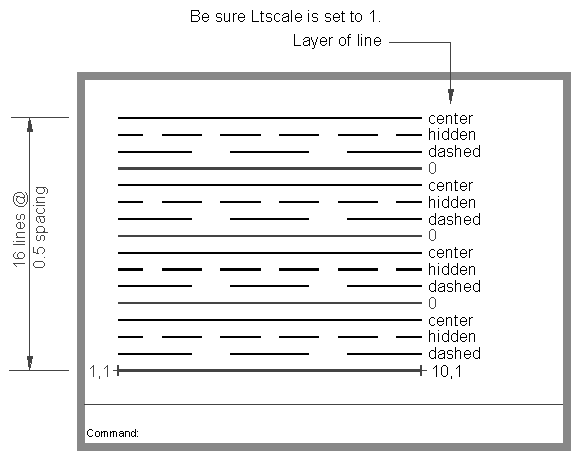
Figure 10.9: Test drawing for Lfilter.lsp
Now that you know what Lfilter does, let's look at how it works. First, it creates a dotted pair representing the layer sublist in an object property list:
(defun LFILTER (/ lay sset count ent newent)
(setq lay (cons 8
(strcase (getstring "\nEnter layer name: "))))
When you are prompted for a layer, the name you enter is first converted to all upper case using the Strcase function. This is done because the value associated with the layer group code in a property list is always in upper case.
In order to make a comparison of data, we must make sure that the values we use in the comparison are in the same format. Since AutoLISP is case sensitive when it comes to string values, we must make sure that the value the user enters matches the case of the layer name in the property list. The strcase function will convert a string to either all upper case or lower case depending on whether a third argument is present and is not nil.
Next, the cons function creates a dotted pair using 8 as the first element. 8 is the group code for layer names. The dotted pair looks like this:
(8 . "Hidden")
Finally, the newly created dotted pair is assigned to the variable lay which will later be used as a filtering value.
The next line obtains the selection set to be filtered:
(setq sset (ssget))
Here, ssget is used without any argument thus allowing the user to select objects using any of the usual AutoCAD selection options. This selection set is then assigned to the variable sset.
Next we come to the while expression.
(setq count 0)
(while (< count (sslength sset))
(setq lay2 (assoc 8
(entget(setq ent(ssname sset count)))))
(if (equal lay lay2)
(if (not newent)
(setq newent (ssadd ent))
(setq newent (ssadd ent newent))
);end if
);end if
(setq count (1+ count))
);end while
This while expression compares the 8 group code sublist of each object in the selection against the variable lay. If it finds a match, the object is added to a new selection set newent. Let's look at this while expression in detail.
First, the counter is set to zero and the conditional test is set up:
(setq count 0)
(while (< count (sslength sset))
Then the 8 group code sublist from the first object in the selection set is extracted and assigned to the variable lay2:
(setq lay2 (assoc 8
(entget(setq ent(ssname sset count)))))
Next, the variables lay lay2 are compared:
(if (equal lay lay2)
If there is a match signifying that the object is on layer "HIDDEN", then the program checks to see if the selection set newent exists:
(if (not newent)
(setq newent (ssadd ent))
(setq newent (ssadd ent newent))
If newent does not exist, then ssadd creates a new selection set containing the object whose layer group code sublist matches (8 . "HIDDEN") then assigns that selection set to the variable newent. If newent does exist, ssadd adds the object to the selection set newent and redefines newent. This last conditional if is required since ssadd must be given different arguments depending on whether it is to create a new selection set or just add an object to an existing selection set.
Finally, the counter in increased by one and the while conditional loop repeats itself:
);end if
);end if
(setq count (1+ count))
);end while
Once the new selection set containing the filtered objects is complete, the last expression returns either the selection set of objects, or if there is only one object in the selection set, the object name.
(if (= 1 (sslength newent))(ssname newent 0) newent)
);end defun
The function sslength is used with the = predicate to see if newent contains only one element. If it does, then ssname is used to extract the object name of the element from the selection set newent. Otherwise, the entire selection set newent is returned. This last step is added to allow the user to use lfilter where only one item is accepted for input such as the offset or fillet commands.
In this sample program, layers are used to filter objects, but you can use any object property as a filter. You can filter objects by linetype, color, or any property available from the property list. Consult the list of group codes in Appendix C for a list of group codes and their associated properties.
Selecting Objects Based on Properties
Another method for filtering can be found built into the ssget function. Ssget allows you to select objects based on a filter list. This filter list is an association list much like a property list. The Getlayer function shown in figure 10.10 simply selects the entire contents of a layer that the user specifies.
;function to select all entities on a layer-----------------------------------

(defun GETLAYER (/ lay)
 (setq lay (list (cons 8
     (strcase (getstring "\nEnter layer name: ")))))
 (ssget "X" lay)
)
Let's see what it does:
1. Save and exit the chapt10 file.
2. Open a file called Getlayer.lsp and copy figure 10.10 into the file. Save and exit the file.
3. Return to the chapt10 drawing file then load Getlayer.lsp.
4. Issue the Erase command. At the Select object prompt, Enter:
(getlayer)
5. At the prompt
Enter layer name:
Enter center. All the objects on layer Center will ghost.
6. Press return. All the objects on layer Center are erased.
Getlayer does its work by using the "X" argument to ssget. This argument allows ssget to create a selection set based on an association list of properties. In the case of Getlayer, the list is one element long.
First, Getlayer prompts the user for a layer:
(defun GETLAYER (/ lay)
(setq lay (list (cons 8
(strcase (getstring "\nEnter layer name: ")))))
The layer name is used to construct an object property dotted pair much like the one in the flayer function. This dotted pair is further included in a list using the list function. The result is a list containing a single dotted pair:
((8 . "CENTER"))
This list is assigned to the variable lay which is in turn applied to ssget to create the selection set:
(ssget "X" lay)
)
Here we see the "X" argument used with ssget to tell ssget that a filter list is to be used to create the selection set. Ssget then searches the drawing database to find all the objects that have properties that matches the filter list.
Getlayer could have been simplified to one expression thereby eliminating the need for the lay variable:
(ssget "X" (list (cons 8
(strcase (getstring "\nEnter layer name: ")))))
We include the lay variable to help explain how this function works.
A filter list can have more than one property sublist element much like an objects property list. But ssget will only accept certain group codes in the filter list. Table shows those group codes and their associated properties:
Group code
Meaning
0
Object type
2
Block name
6
Linetype name
7
Text style name
8
Layer name
38
Elevation
39
Thickness
62
Color number; 0=byblock, 256=bylayer
66
Attributes-follow flag for blocks
210
3D extrusion direction vector
Accessing AutoCAD's System Tables
The tblnext and tblsearch functions are provided to help you gather information about layers, linetypes, views, text styles, blocks, UCSs and viewports. Each one of these AutoCAD tools is represented in a table that contains the tools status. Tblnext and tblsearch return this table information in the form of association lists similar to object property lists. But unlike object property lists, you cannot modify lists returned from Tblnext and tblsearch. However, you can modify the settings associated with a tblnext or tblsearch listing using the standard AutoCAD commands.
To use tblnext, enter the following at the command prompt:
(tblnext "layer")
You will get an association list similar to the following:
((0 . "LAYER") (2 . "0") (70 . 0)(62 . 7) (6 . "CONTINUOUS"))
The individual dotted pairs can be extracted from this list using Assoc just as with any other association list or property list. Enter the tblnext expression above again and you will get an association list of the next layer. Each time tblnext is used, it advances to the next table setting until it reaches the last item in the particular table you are searching. Once it reaches the end, tblnext returns nil. To reset tblnext to read from the beginning of the table again, you include a second argument that evaluates to non-nil as in the following:
(tblnext "layer" T)
If this expression is entered, you will get the same list as the one you got the first time you used tblnext. We used T as the second argument but it could be any expression that evaluates to non-nil. Once you get a list, you can manipulate in the same way as any other association list.
Tblsearch works slightly differently. Instead of stepping through each table item, tblsearch will go to a specific table item which you name. Enter the following:
(tblsearch "layer" "hidden")
You will get the association list pertaining to the layer "hidden".
((0 . "LAYER") (2 . "HIDDEN") (70 . 0)(62 . 7) (6 . "HIDDEN"))
If you include a non-nil third argument to tblsearch, then the next time tblnext is used, it will start from the next item after the one obtained from tblsearch.
Though we used layer settings as an example for tblnext and tblsearch, any of the table settings mentioned at the beginning of this section can be used.
Figure 10.11 shows a program that uses tblnext to store layer settings in an external file. This program can be useful if you use a single multi-layered drawing for several types of output. For example, an architect might have a drawing that serves as both an electrical layout plan and a mechanical floor plan with different layers turned on or off depending on which type of plan you want to edit or print. You can store your different layer settings for the electrical and mechanical plans then restore one or the other group of settings depending on which plan you indent to work on.
;Program to save layer settings in a file -- Lrecord.lsp
;-----------------------------------------------------------------------------
(defun c:lrecord (/ fname lafile record)
 (setq fname (getstring  "\nEnter name of layer file: "));get name of file
 (setq lafile(open fname "w"))                           ;open file, file desc.
 (setq record (tblnext "layer" T))                       ;get first layer set.
  (while record                                          ;while record not nil
   (prin1 record lafile)                                 ;print record to file
   (princ "\n" lafile)                                   ;print to next line
   (setq record (tblnext "layer"))                       ;get next layer
  );end while
 (close lafile)                                          ;close layer file
);end defun

;Program to restore layer settings saved by lrecord
;-----------------------------------------------------------------------------
(defun c:lrestore (/ clayer fname lafile flayer lname oldcset)
 (setvar "cmdecho" 0)                                    ;turn off prompt echo
 (setvar "regenmode" 0)                                  ;turn off autoregen
 (Setq clayer (getvar "clayer"))                         ;find current layer
 (setq fname (getstring "\nEnter name of layer file: ")) ;get layer file name
 (setq lafile(open fname "r"))                           ;open layer file
 (setq flayer (read (read-line lafile)))                 ;read first line
 (while flayer                                           ;while lines to read
    (setq lname (cdr (assoc 2 flayer)))                  ;get layer name
    (setq oldcset (assoc 62 flayer))                     ;get color setting
    (if (and (< (cdr oldcset) 0) (equal lname clayer))   ;if col. is off/currnt
        (command "layer" "C" (cdr oldcset) lname "Y" "") ;insert "Y" response
        (command "layer" "C" (cdr oldcset) lname "")     ;else normal
    );end if
    (Setq oldcset (assoc 70 flayer))                     ;find if frozen
    (if (= (cdr oldcset) 65)                             ;if frozen then...
        (if (equal lname clayer)                         ;if current layer
            (command"layer" "freeze" lname "y" "")       ;insert "y" response
            (command"layer" "freeze" lname "")           ;else normal
        );end if
        (command "layer" "thaw" lname "")                ;else thaw layer

    );end if
    (setq flayer (read-line lafile))                     ;read next in file
    (if flayer (setq flayer (read flayer)))              ;strip quotes
 );end while
 (close lafile)                                          ;close file
 (setvar "regenmode" 1)                                  ;reset autoregen on
);end defun
Figure 10.11: A program to store layer settings
The Lrecord program show at the top of the figure 10.11 simply creates a file then copies each layer association list into the file. Lrecord uses the prin1 function to perform the copying because prin1 does not affect the list in any way. If princ were used, the strings data types within the list would be striped of their quotation marks. Also, Write-line is not used since it expects a string argument. Both princ and prin1 will write any data type to a file.
The Lrestore program simply reads each line back from a file created by Lrecord. Since the Read-line function returns a string, the read function is used to strip the outermost level of quotation marks from the string to return the association list.
(setq flayer (read (read-line lafile)))
The Layer data is then extracted from this list and applied to the layer command which sets the layer back to the saved settings. The if conditional test is used to see if the layer to be restored is the current layer. A different command expression is evaluated depending on whether the layer in question is current or not. This is done since the layer command will issue an extra prompt if the current layer is to be turned off or frozen.
(if (and (< (cdr oldcset) 0) (equal lname clayer))
(command "layer" "C" (cdr oldcset) lname "Y" "")
(command "layer" "C" (cdr oldcset) lname "")
)
You have seen a variety of ways to select, edit, and manipulate AutoCAD objects. Selection sets and object filters can provide a powerful means to automating AutoCAD. Tasks that would normally take several minutes to perform manually can be reduced to a few seconds with the proper application of selection sets and recursive expressions.
You have also seen how changes in the way you write your program can affect your programs speed. Though the speed of your programs may not be an issue to you now, as your experience with AutoLISP expands, your need for speed will also expand.
In the next chapter, we will continue the discussion of object access by looking at how polylines and attributes can be edited with AutoLISP.